Showing posts with label Fabric. Show all posts

Monday, September 8, 2014

A Mini Wedding Art Quilt for a Wonderful Niece #1 of 2

I have promised a small mini art quilt for a wonderful niece since, I don’t know, sometime last year!  Well, she got married this February. So, I thought I should try to finish one soon. I want them to be perfect. There are a few mistakes, er changes, but, as I’ve been told, the imperfections are what make these mini art quilts unique. Still, it’s hard for me to go outside the box. If only I did that, all of my mini art quilts would be finished much sooner.

Anyway, here is one of them. (I made her two since she was so patient.) I’ll show the other one next week.

She received them last week; so it’s safe to show them here now.

 What I used to make this 15” x 11.5” mini art quilt:
* Laser printed transparency sheet with picture pulled from the computer.
* Three different types of home dec cotton fabric
* Moire fabric (with a wavy watered appearance), for the birds, flower, and hearts
* Same home dec cotton fabric for the butterflies
* Sizzix butterfly die
* Peltex batting sandwiched between  the fabric to help make the mini art quilt stiff
* Buttons
* Heat set heart gems
* Crystals for the birds eyes
I frayed the edges of the frame and used colorful decorative thread. I sewed around the appliqués using the appliqué stitch.


Tuesday, August 12, 2014

Mini Art Quilt - Yoga Sticks Sun Salutations #1


I really like my yoga instructors at FreeSpirit Yoga, here in Long Beach, Ca. They are my friends now, because they are so wonderful!

I am in the process of sewing gifts for each of them to show my appreciation. So far, I’ve made this Mini Art Quilt - “Yoga Sticks” Sun Salutations for one of them, Jenni Brandon. As well as being a wonderful yoga instructor, she is also an award-winning composer, conductor! Please go visit her website .
Now, I am not an artist at all. No. No. No. No! I leave that up to my Childrens’ Book Illustrator Daughter, Christina Forshay, who certainly didn’t take after me in the art department. In fact, I can barely draw stick figures—really! But I used sun salutation stick figures to make this 11½”x 10” small art quilt for Jenni B. As usual, it took me far too long to make it. 

To determine what type of “Yoga Sticks” I wanted, I drew a few on the back of an envelope to see how they would turn out to see if I in fact, could draw stick figures.

Not bad, but if I wanted them to look more consistant, I had to use a Mac drawing program, Pixelmater to help draw my “Yoga Sticks.” Hey, for someone like me, who literally cannot draw, I need all the help I can get. Period.

I tried three different methods of using the drawings of my “Yoga Sticks” to see which one I wanted to go with, as far as designing the mini art quilt. I’ve used all three before.

One was to print a mirror image from my laser printer, then transfer the printed image onto fabric using a blender pen or Citra Solv. It works really well!

Second, was to print an image from my laser printer onto a transparency sheet, then place it on top of fabric.

Third—and this is the one I used, I printed the “Yoga Sticks” from my laser printer, then placed the printed sheet under white muslin and traced my “Yoga Sticks” onto it. I then sewed over the tracings a few times using the regular utility straight stitch set at 2.0. I didn’t do any free-motion, as I was afraid I wouldn’t be able to sew staring lines. I did have a hard time sewing the traced oval/circle heads on my “Yoga Sticks,” so I filled in the heads and tried to make them better shaped using a Sakura Identi-Pen Dual-Point Marking Pen. It is permanent and works well on fabric. It didn’t bleed at all on my muslin.

After I sewed over the tracings and filled in the heads with the marker, I dyed the white muslin. It came out a greenish blue color.

I put the rest of the mini art quilt together with home dec cotton and cotton ticking with extra firm stabilizer sandwiched in between.

Items I used to decorate this mini art quilt were: a vintage earring piece, different size “pearls,” ribbon, buttons, and a couple of decorative stitches.


I really hope my friend Jenni B enjoys my “Yoga Sticks” mini art quilt. I enjoyed making it.


Monday, July 21, 2014

Zippered Pouch Added to Yoga Mat Carrier

While I am working on something special for a wonderful yoga teacher, who is also a composer,  as well as a wedding gift for my niece—so sorry it’s taking so long Sweetie, I sewed a zippered pouch to attach to my store bought yoga bag, to hold more things, because apparently, I like to torture myself and carry more weight than is necessary. I’m always try to add homemade sewing accessories to my purchased items. Why?—I don’t know why. 

First, I made another pair of the small yoga pad covers to put under my sensitive heels when they have to touch the hardwood floor. I used one of my favorite, well-made heavy cotton material. It isn’t flimsy at all, but it also isn’t home dec fabric either. I purchased a lot of yards of this a few years ago at JoAnns. I really wish I hadn’t sold—at a great discount—a couple of yards of this fabric, to a woman who worked at JoAnn’s, as it is one of my favorites, and can’t be found any where anymore. 

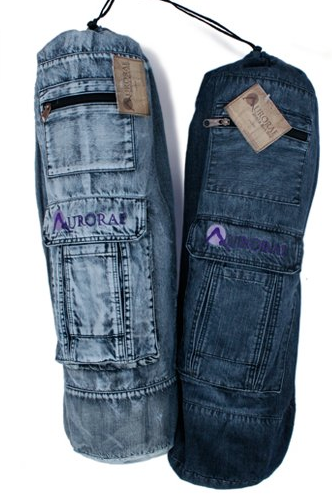
But, the main accessory I sewed, is the zippered pouch I attached onto the flap of one of these roomy yoga mat carriers, to cover up the purple logo—and yes, I bought both of them because I couldn’t decide which one I wanted. It is the Aurorae Yoga Mat Bag “The Mat Sak” 100% Cotton Premium Ring Spun Denim. I bought them on Amazon back in May.

Anyway, here is the zippered pouch I made. Behind the bag is a water bottle carrier that I also made. I  can attach it to the carrier sling.

Inside, the zippered pouch holds my small yoga pads I made, but I can put other things in it as well.


Every time I turned over the bag to empty out the mat, everything came out of the large cargo pocket, like my sunglasses and iPhone. The velcro apparently isn’t sturdy enough, so I added a strong snap that covers both the large cargo pocket as well to the cell phone pocket on the yoga carrier. My cell phone doesn’t fit inside the little pocket because my iPhone cover is too big. But I’m sure I can find something else to put in there. Plus, it will stay closed at the same time the large cargo pouch is closed, since the large cargo pouch flap snaps onto the little pocket.
Note that when the pouch is lifted, the top flap of the yoga bag is also lifted. That’s because I also sewed a stay stitch along the top and the sides above the zipper, as well as inside the back of the pouch through the opening of the zipper so that when the pouch is lifted, the logo still can’t be seen.


Monday, December 16, 2013

Cordless Iron Cover

To me, one of the best inventions—besides flameless battery-operated LED candles, are cordless irons! I own two of them. I gave my husband, Tony, the first one I bought—and yes, he irons his own clothes—the Panasonic NI-L700SR Cordless Steam/Dry Iron, when I purchased the  Panasonic NI-WL600 Cordless Multi-Directional Iron a year later. It’s a little smaller and is pointed at both ends. Anyway, I love this one too. It’s in my sewing room—that no one is allowed in, including my husband, as well as our daughters and grand babies!

The older one is still going strong after almost three years! My husband keeps it in the kitchen atop the refrigerator. I made a cover for the older one using the same cotton fabric that I used to make the kitchen windows door curtain, and dish towels. The towels hanging on the oven door are for decoration only. Although, when one of our daughter’s come over, she uses them. 
I didn’t have a pattern to make this cordless iron cover; but I used the same technique when I made tissue box covers.


Added an opening for the handle using the same technique for making a tissue box cover

Monday, October 14, 2013

60th Wedding Anniversary Small Art Quilt

A couple of weeks ago was my husband's parents 60th wedding anniversary. It wasn't until the day of their party that I came up with something to make to give them. I scanned their party invitation and cropped, then altered the pictures. I printed the picture from my laser printer on to transparency film that I've had for many years. I cut up a lot of different fabrics to see what would go with it, but I settled with the one below that is laced with tiny gold threads. (I know that it is supposed to be white diamonds for a 60-year, but I didn't have time to go shopping for white fabric, and didn't have any in my stash.) I used Peltex stiff interfacing and thin cotton batting sandwiched in between the front and backing. Since I didn't have much time, made the backing longer and wider, then  just folded up each corner, instead of the usual mitered binding. Here is the finished product.

Monday, August 19, 2013

Sewing Gifts: Wristlet Zippered Pouch, Travel Tissue Holder, Sachets Filled With Lavender

There is a wonderful person at the front desk of one of the Y's I attend. She is a shy, but always helpful, pleasant person. She never seems to give anyone any attitude. She seems to be always in a good mood. So I wanted to say "Thanks" by giving her these little gifts I made. Thank you Erin.
The fabric used is 100% cotton for the main outside, while the lining and hearts are made with cotton flannel.

The wristlet zippered pouch is around 7 1/2" x 7 1/2" I quilted only the pouch using batting in-between the cotton flannel lining and main cotton fabric. I also used a 7" zipper.

The handle for the zippered pouch is cut about 3 1/2" wide (can't see the picture of the handle)

The travel tissue holder holds standard Kleenix Travel Tissues. It's overlapped so that it says closed.

The two sachets are made using main cotton fabric stuffed with dried lavender, while the appliquéd hearts are made using cotton flannel.
I used Sizzix die # 655776 to cut the sachets. For the hearts on the sachet, I used Sizzix die #656334.

I took many pics of how I made each of them, but there are numerous sites to find instructions for the quilted pouch and travel tissue holder.

Monday, April 1, 2013

Thank You Basket Filled With Various Chocolate Candy + Chocolate Wine and Handmade Infinity Scarf


This is a thank you gift for the wonderfully amazing Dr. Kasra Rowshan who recently performed my spinal surgery. He has to be one of the most compassionate, caring doctor I have ever come across!

This ChocoVine chocolate wine is sweet and very smooth--simply delicious! I wanted to tell my Doctor that if he didn't like it, to give it back. I think he'll like it, as I heard he is  a "choco-holic."
I love this chocolate wine!
I wanted to make something for him, so I thought why not a infinity scarf. It seamed easy enough. I  purchased one yard of 100% 45" wide cotton flannel shirting. I cut in half length-wise. I then sewed the two halves together to make one long one. I then folded the sewn halves length-wise again, with right sides together. I sewed a straight stitch down the length of the scarf. Since I did not take pictures of how I was making it, I found it hard to explain the rest of the tutorial. For complete video instructions, here is a very easy to follow video tutorial. This one, I found to be the easiest for me to understand. My wonderful orthopedic  surgeon said he really liked it. He didn't know I made it. He said  he will use it for when he goes to the ski resort.

I also made these "criss-cross" coasters. I found a cute, colorful, very easy tutorial at Allsorts.
Front of coasters
Back of coasters
Yummy assorted chocolate found at Trader Joe's! (Thanks dear daughter for buying them for me!)
Yummy!

Monday, May 21, 2012

Beautiful Burp Cloths

Our youngest daughter just had a beautiful baby girl! She is about four weeks old. So now that makes our forth and final grandbaby--two boys and two girls. "The kitchen is now closed." Our two daughters now each have a boy and a girl respectively.

 Here are burp cloths I made for the newest little grand baby girl. These are made of cotton (front), with flannel (back). This is the first time that I am using flannel instead of the Gerber pre-folded diapers. Flannel is much softer and lighter.


Monday, August 29, 2011

Embroidered Golfing Shoes Bags

My husband Tony, our daughter Christina, and her husband Eric are "weekend hacker golfers"--my husband's words. So one day I thought I would make them bags for their golf shoes. I was not confident enough to embroider directly on the bags themselves, so I appliqued their initials. However, I finally got brave enough to embroider initials for the last one I made which was Christina's.  I was so nervous when I embroidered directly on the shoe bag and it came out perfect! Yea!!


Tony
Tony
Eric
Christina