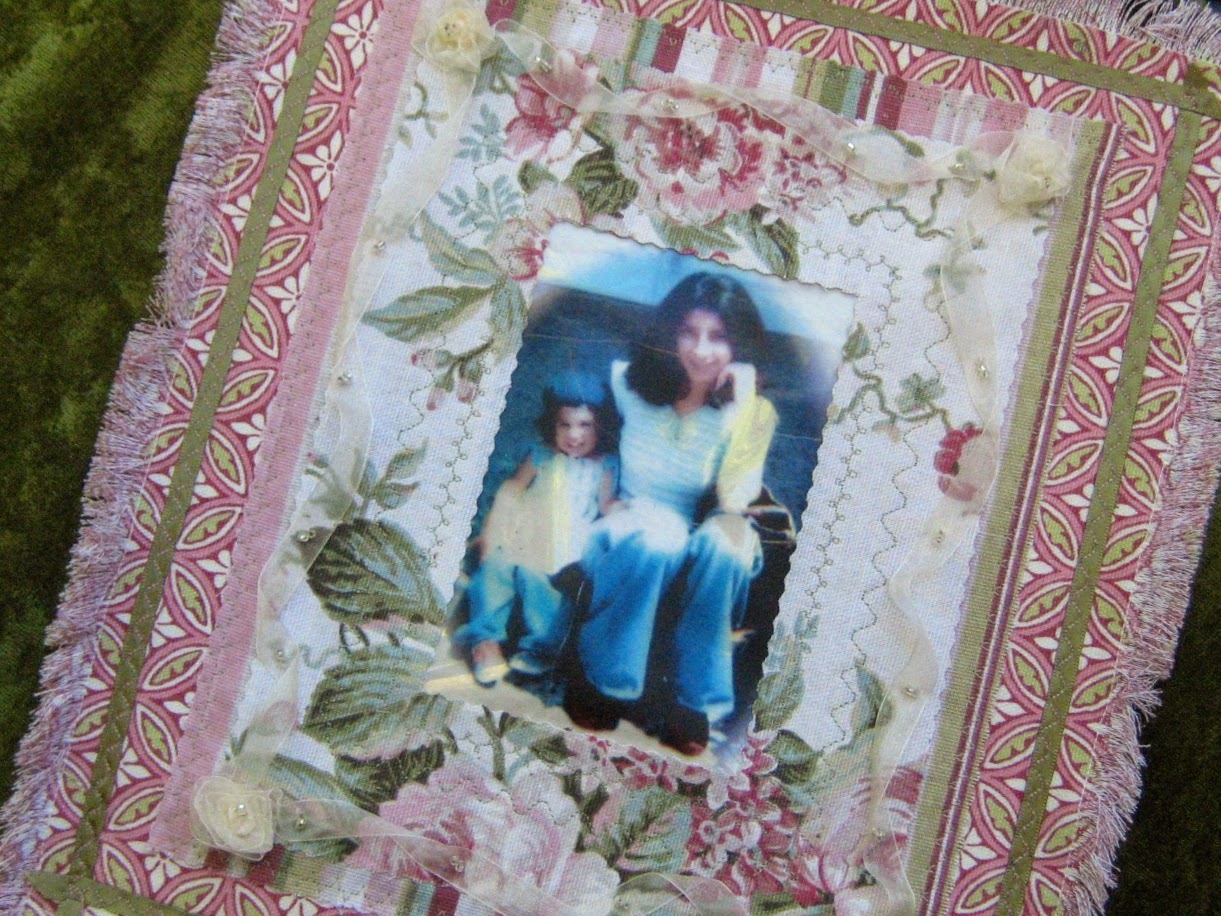
Anyway, the size of this very small art quilt is 11inches x 13 inches. I used three matching home dec fabrics, decorated with small green ribbon, along with very tiny silver glass rocaille seed beads attached to a light almost clear ribbon. I made roses out of the ribbon also. The picture was scanned, then printed on a transparency sheet using my color laser printer. Pretty.
Showing posts with label Art Quilts. Show all posts
Monday, August 25, 2014
Mini Art Quilt for a Dear Adult Daughter for Her Birthday
A couple of weeks ago was my oldest daughter’s birthday. I decided at the very last minute to make her a mini art quilt using my favorite picture of her. She’s about twenty-two months. (I’m the bigger one on the right.) Of course, it took me over a week to make it. I have an excuse though. I am also trying to finish two other small art mini quilts for a very dear niece. I’ve been working on them for—what, almost a year?! That’s why she gets two of them!
Anyway, the size of this very small art quilt is 11inches x 13 inches. I used three matching home dec fabrics, decorated with small green ribbon, along with very tiny silver glass rocaille seed beads attached to a light almost clear ribbon. I made roses out of the ribbon also. The picture was scanned, then printed on a transparency sheet using my color laser printer. Pretty.


Anyway, the size of this very small art quilt is 11inches x 13 inches. I used three matching home dec fabrics, decorated with small green ribbon, along with very tiny silver glass rocaille seed beads attached to a light almost clear ribbon. I made roses out of the ribbon also. The picture was scanned, then printed on a transparency sheet using my color laser printer. Pretty.
Monday, June 23, 2014
Mini RoseAngel Art Quilt Using Transparency + Baby Wipes (Unused ofcourse!)
Well, here is another RoseAngel Mini Art Quilt.
I know it’s been a couple of months since I posted anything, but life seemed to get in the way. I wish I could be like a lot of other craft bloggers out there who post weekly. Even if life does get in the way, they somehow still manage to put beautiful and amazing work out every week! My hat’s off to you wonderful craft bloggers out there.
Anyway, here is the finished project. This one measures about 10” x 12”. The fabric used was utility (bottom layer), ticking, (striped layer) and home decor (paisley). I put batting between the home decor and ticking fabric to raise the picture a bit. I added some decorative stitching, as well as stitched the see-through ribbon that went around the frame, (on the utility fabric).
A couple of unusual things I used: One was that I had some unused baby wipes that had dried out. I washed them, then dyed them. I also found that not all baby wipes are the same. I have a few different brands, and found the ones that feel more like cotton, work better. They are softer, and take the dye better. I put one under the printed out transparency picture.
That’s the second unusual thing I used. I found a box of old transparancies from the early 90’s, the ones used for color copiers for overhead projectors. I printed on them using my laser printer, since it also uses toner. (Just so I don’t waste any of the sheets, I print a few pictures on one sheet, then cut them out. If I had to buy some more, I’m sure they would be expensive. (Example: Staples brand is 100 sheets for around $62. I also looked and saw that there are ones for laser printers for around $21 for 50 sheets.)
I made the decorative roses. This one was made out of fabric scraps, with a pearl tucked inside; while the one just below it was made from ribbon.
I took vintage costume jewelry for the other added decorations. I found this shiny small round “diamond” button, (including the one above, as well as two others I used), put through a very, very old safety pen. (I’ll take a pic of it one day soon. Hopefully. Don’t hold your breath.)
This ribbon has an earring attached.
I wrote this little saying for added decoration.
Here is the see-through ribbon that goes around the frame,where I used a decorative stitch to attach it to the utility fabric.
I added little “pearls,” using a pearl paint pen on the rick-rack. (Plus here’s a closer look at the fiber baby wipe. It’s a sage green color, even though it looks very light here.)
Labels:
AngelRose,
Art Quilts,
Baby Wipes,
Handmade Ribbon Roses,
Sewing,
Sewing Projects,
Transparency Sheets
Monday, April 7, 2014
Small Transfer Art Quilt for a Wonderful Hand Doctor
The day after Christmas last year, I was sewing a gift. I was in a hurry, so I was not careful, and the rotary cutter jumped a very skinny ruler, and sliced right through my right index finger, from the nail bed through the padding on the other side—OUCH!
I’ve been going to a hand doctor since then. I always give him a hard time, in that I—up until now—refused to look at my finger. YUK. Well, I thought I would make it up to him for not being a very good patient. I made him this small 9” x 11” art quilt. His office walls are covered with pictures of hands, wrists, and fingers, but none made from fabric.
Here is how I did the transfer. First, I downloaded this free vintage advertisement palmistry hand from The Graphics Fairy.
I then printed it out on plain paper, using my Brother HL-4570CDW Color Laser Printer. For this to work, you must use a toner laser printer or a copier, not a inkjet printer.
I also owned a inkjet printer, but it just broke, and I haven’t yet bought another one. Otherwise, I probably would have used the many fabric sheets I purchased. I always buy way more then I need!
Next, and this is very important, I printed the image using a mirror method. Meaning, I used MS Word, imported the image, then flipped the image. I do this only if the image has words in it. Then I used a blender transfer pen. I used Chartpak AD Marker Colorless Blender Pen that I bought online from Art Supply Warehouse. They were on sale for $2.00 each, so I purchased a lot of them. I also tried using acetone; the one that takes off nail polish, and one purchased from the art supply store, but they didn’t work for me. Anyway, I taped my printed image face down onto 100% cotton muslin. Then in a well ventilated area—outside, I rubbed the transfer pen onto the fabric. It came out beautifully! Yea!!! Can’t wait to do more of these transfers onto fabric.
Monday, October 7, 2013
Making Rosettes Out of Scraps!
| From this... |
| ...To this |
These "rosettes" started when I cut off the edges of a piece of muslin to square it off. Making rosettes are my forte. I've been doing them for years. I would make them when we used to go on car trips, as a way to make the time go by. I also used to get car sick, so reading was out of the question. I now take motion sickness pills so I can read my iPad or iPhone while on the road.
Anyway, I as I said, I make many of these rosettes. I use a needle and thread to keep it together as I make it. I'm going to be using them for a very small art quilt that I'm working on. The muslin that I was squaring off is going to be used for the front of the small art quilt.
| Rosette #1 |
| Rosette #2 |
| I take one end and wrap a couple of inches on to itself; then twist for flip the "ribbon" under once as I continue to wrap. |
As I continue to twist or flip the "ribbon," I sew the bottom sew that it stays wrapped.
|
Monday, July 11, 2011
Sewing Project: Angel Rose Small Wall Hanging Quilt
I guess you could say I have a running theme. The Angel Rose picture. It is very dear to me. I try to incorporate it in many things I make. I sew enjoy it! It is pretty small, about 8" x 10.
I gave it to one of my sisters who put it into a frame.
Subscribe to:
Posts (Atom)