Monday, November 17, 2014

Jeans to Cover Plastic Planter Pot - No Sew

The other day, as I was driving in the alley to my garage, I came upon a trash bin that caught my eye.  (it was open) that had a pair of children’s stretch jeans. I went home grabbed some gloves with a shopping bag, in case I found anything else useful. You know the saying, something like “someone else’s trash to my treasure.” 

When I went home, I grabbed a couple of the plastic planter pots that I have. I then took the stretch jeans and cut 8 inches off of the legs. I slipped them over the plastic pots. I folded over the top onto itself barely covering over the top, and voilà!  Easy peasy! I probably could have decorated them so they wouldn’t look so plain, but then anything looked better than those plastic planter pots. They are so cute. I’m going to look for more stretchy jeans, since they are very easy to stretch over the plastic pots.


Stretch little childrens jeans

I cut 8 inches off the bottom leg.

From this to…
…this—in just a few minutes.


Monday, October 20, 2014

Old Fashioned Wall Hangings

A long while back, during the Christmas season, our credit card was compromised, and so I had to make handmade gifts instead of buying them. I just ran across them in a box recently, so I thought I would share them. I got into making ribbon roses. I mean I went wild and crazy making them! So now I have enough to last a lifetime. I would make them while in the waiting rooms of doctors offices, at night in bed; and when we would go on a trip to make the time go by. So, I have made a lot. And I mean A LOT! I use them when I’m making my mini art quilts. 
Here is one of them:
Supplies used:
Scrap of velvet for the background
cardboard (cut in a circle)
batting (to glue on top of the cardboard circle)
ribbon (to make ribbon roses, as well as to frame the picture)
lace (to go around the frame)
laminated picture
pins (to attach the pearl beads)
trim (around frame)


Monday, September 22, 2014

Handmade Yoga Knee Pads #2


Knee, back or head long pad 5 ½” x 24” 

Knee or heal pads 5” x 7” 

I’m feeling generous. So, someone will be receiving these as a  gift! Anyone out there do yoga?

I notice that there are some people in my yoga classes who either fold their yoga mats or use blankets for their knees.  I’ve made these before and bring them to class. Sometimes, I will go over and let someone try these out if I notice them having some trouble with their knees, or I hear them tell the instructor before class that their knees are bothering them. Luckily, I don’t have that problem—yet.

These are so easy to make. So far I’ve used cotton fabric with cut up yoga mats inside. The next ones I make, I think I will try other things inside, like quilted muslin stuffed with thick plush batting or fabric scraps.

(See MONDAY, APRIL 22, 2013

“Yoga Accessories: Small & Long Yoga Pads” for the first yoga pads I made.

Theses don’t just have to be used for knee pads. I will use them for the soles of my feet when my feet have to be on the hardwood floor. I will also use them to cushion my head when we do a pose where we stand with out feet spread apart, then bend down and sometimes my head can touch the floor! Or they can be used as a pillow.
The small pads are made envelope style. The mat can also be taken out to was the cover

Here is the cut-up mat that goes inside the envelope cover

This is how it looks when the cut-up mat is inserted

On this long mat, I sewed one end and tucked the other end, it can be taken out for washing

Pretty cotton fabric from JoAnns
See 


Monday, September 15, 2014

A Mini Wedding Art Quilt for a Wonderful Niece #2 of 2

 
The one on the right, was shown on previous blog.
Here is the second of the two Mini Art Quilts that I made for the niece who got married this year.

 What I used to make this 11” x 9.5” mini art quilt:
  • Laser printed transparency sheet with picture pulled from the computer (printed in black and white) 
  • Coordinating cotton fabric for both frame and handmade fabric flower
  • Peltex batting sandwiched between  the fabric to help make the mini art quilt stiff
  • Ribbon
  • Found decorations
  • Opalescent “pearls” sewn onto store-bought fabric flower embellishments
  • Silver crystal seed beads
Opalescent “pearl” sewn onto store-bought fabric flower embellishment
I also frayed the edges of the frame, and used white decorative stitch on the ribbon around the frame 
Handmade ribbon rose embellished with silver crystal seed beads sewn onto handmade cotton flowers
Back
(Names and date covered up for privacy)


Monday, September 8, 2014

A Mini Wedding Art Quilt for a Wonderful Niece #1 of 2

I have promised a small mini art quilt for a wonderful niece since, I don’t know, sometime last year!  Well, she got married this February. So, I thought I should try to finish one soon. I want them to be perfect. There are a few mistakes, er changes, but, as I’ve been told, the imperfections are what make these mini art quilts unique. Still, it’s hard for me to go outside the box. If only I did that, all of my mini art quilts would be finished much sooner.

Anyway, here is one of them. (I made her two since she was so patient.) I’ll show the other one next week.

She received them last week; so it’s safe to show them here now.

 What I used to make this 15” x 11.5” mini art quilt:
* Laser printed transparency sheet with picture pulled from the computer.
* Three different types of home dec cotton fabric
* Moire fabric (with a wavy watered appearance), for the birds, flower, and hearts
* Same home dec cotton fabric for the butterflies
* Sizzix butterfly die
* Peltex batting sandwiched between  the fabric to help make the mini art quilt stiff
* Buttons
* Heat set heart gems
* Crystals for the birds eyes
I frayed the edges of the frame and used colorful decorative thread. I sewed around the appliqués using the appliqué stitch.


Monday, August 25, 2014

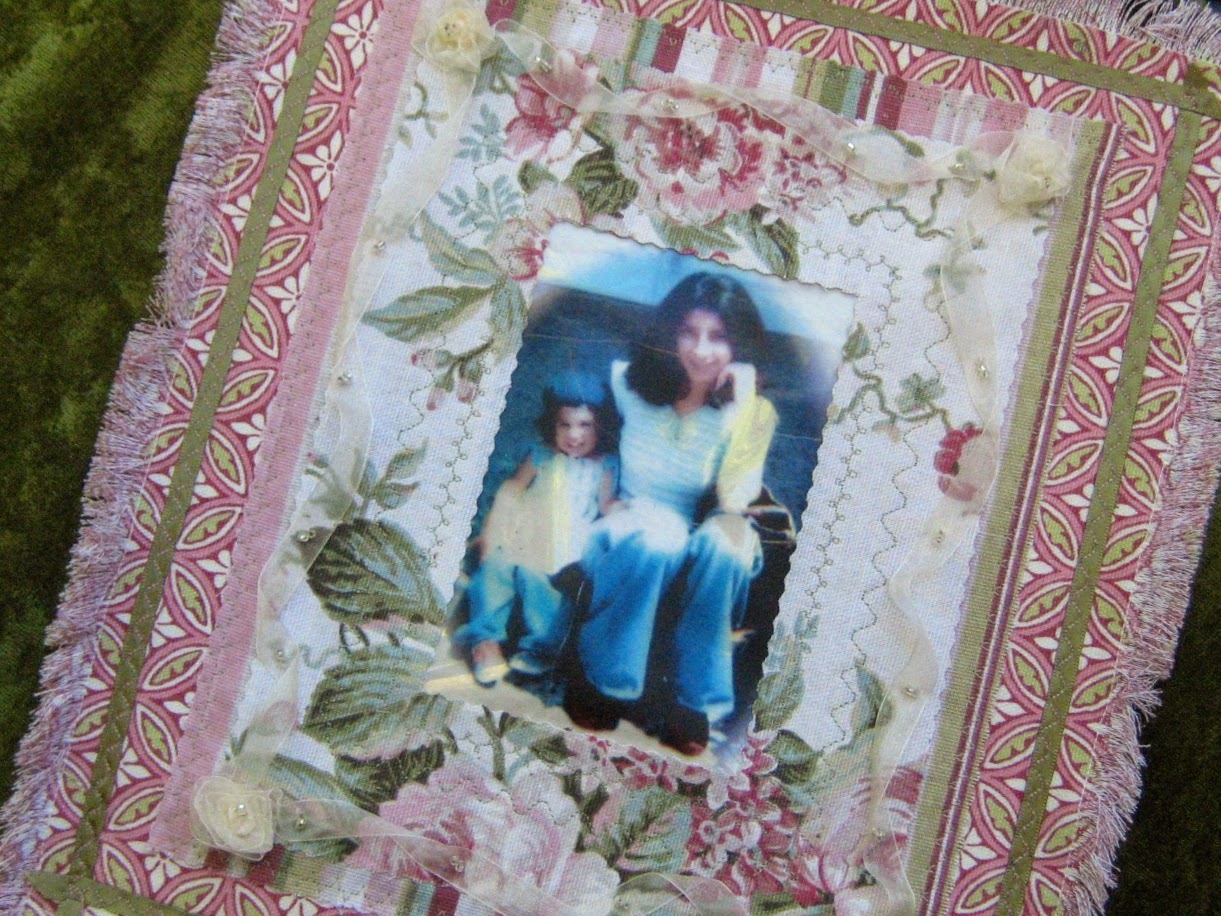
Mini Art Quilt for a Dear Adult Daughter for Her Birthday

A couple of weeks ago was my oldest daughter’s birthday. I decided at the very last minute to make her a mini art quilt using my favorite picture of her. She’s about twenty-two months. (I’m the bigger one on the right.) Of course, it took me over a week to make it. I have an excuse though. I am also trying to finish two other small art mini quilts for a very dear niece. I’ve been working on them for—what, almost a year?! That’s why she gets two of them!

Anyway, the size of this very small art quilt is 11inches x 13 inches.  I used three matching home dec fabrics, decorated with small green ribbon, along with very tiny silver glass rocaille seed beads attached to a light almost clear ribbon. I made roses out of the ribbon also. The picture was scanned, then printed on a transparency sheet using my color laser printer. Pretty.


Tuesday, August 12, 2014

Mini Art Quilt - Yoga Sticks Sun Salutations #1


I really like my yoga instructors at FreeSpirit Yoga, here in Long Beach, Ca. They are my friends now, because they are so wonderful!

I am in the process of sewing gifts for each of them to show my appreciation. So far, I’ve made this Mini Art Quilt - “Yoga Sticks” Sun Salutations for one of them, Jenni Brandon. As well as being a wonderful yoga instructor, she is also an award-winning composer, conductor! Please go visit her website .
Now, I am not an artist at all. No. No. No. No! I leave that up to my Childrens’ Book Illustrator Daughter, Christina Forshay, who certainly didn’t take after me in the art department. In fact, I can barely draw stick figures—really! But I used sun salutation stick figures to make this 11½”x 10” small art quilt for Jenni B. As usual, it took me far too long to make it. 

To determine what type of “Yoga Sticks” I wanted, I drew a few on the back of an envelope to see how they would turn out to see if I in fact, could draw stick figures.

Not bad, but if I wanted them to look more consistant, I had to use a Mac drawing program, Pixelmater to help draw my “Yoga Sticks.” Hey, for someone like me, who literally cannot draw, I need all the help I can get. Period.

I tried three different methods of using the drawings of my “Yoga Sticks” to see which one I wanted to go with, as far as designing the mini art quilt. I’ve used all three before.

One was to print a mirror image from my laser printer, then transfer the printed image onto fabric using a blender pen or Citra Solv. It works really well!

Second, was to print an image from my laser printer onto a transparency sheet, then place it on top of fabric.

Third—and this is the one I used, I printed the “Yoga Sticks” from my laser printer, then placed the printed sheet under white muslin and traced my “Yoga Sticks” onto it. I then sewed over the tracings a few times using the regular utility straight stitch set at 2.0. I didn’t do any free-motion, as I was afraid I wouldn’t be able to sew staring lines. I did have a hard time sewing the traced oval/circle heads on my “Yoga Sticks,” so I filled in the heads and tried to make them better shaped using a Sakura Identi-Pen Dual-Point Marking Pen. It is permanent and works well on fabric. It didn’t bleed at all on my muslin.

After I sewed over the tracings and filled in the heads with the marker, I dyed the white muslin. It came out a greenish blue color.

I put the rest of the mini art quilt together with home dec cotton and cotton ticking with extra firm stabilizer sandwiched in between.

Items I used to decorate this mini art quilt were: a vintage earring piece, different size “pearls,” ribbon, buttons, and a couple of decorative stitches.


I really hope my friend Jenni B enjoys my “Yoga Sticks” mini art quilt. I enjoyed making it.